Cloning Wizard
Equipment can be quickly cloned to create new assets. From the Dashboard interface, the Cloning Wizard can be opened from the CLONING WIZARD hyperlink. You can also add a button to the equipment view header, or launch it with Ctrl+O.
![]()
Cloning Wizard button

Example — Cloning Wizard Dashboard view
When this option is selected, the Clone Current Equipment dialog appears:
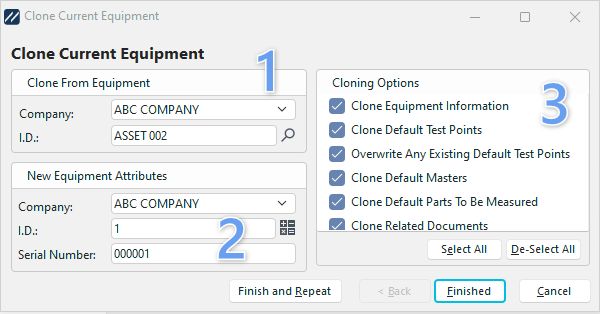
Clone Current Equipment Wizard
1. Clone From Equipment
Enter the Company and I.D. of the equipment that you are cloning. The current equipment is the default.
2. New Equipment Attributes
Enter the Company, I.D., and Serial Number of the new equipment that will be created by the cloning process. The current company is the default company. The current serial number is the default serial number.
Use the Auto Numbering Wizard to quickly and consecutively add an ID number to the equipment.
3. Cloning Options
Choose the cloning options. Most of the options are fields that can be selected for cloning — by default, all options are selected. If only a few fields should be excluded from the cloning process, deselect the exceptions.
The non-field options are:
- Overwrite Any Existing Default Test Points — overwrites existing test points when cloning over a previously entered gage. If this option is not chosen, a dialog will ask whether you want the test points to be merged. In that case, IndySoft only merges in a test point's information when the new gage's test point Standard equals the old gage's test point Standard, and only the test point information checked in Cloning Options is merged.
- Locate Equipment After Cloning — IndySoft will find the new gage after the cloning process completes.
- Default Empty Schedules — if the new gage's Company and I.D. match equipment that already exists in IndySoft, the user will be prompted whether to clone the old information over the existing equipment.
When you are done cloning, press Finished to exit, or Finish and Repeat to clone another piece of equipment.