Data Collection
Data collection for As Found and As Left looks the same. Below is the form for RS-232 collection.
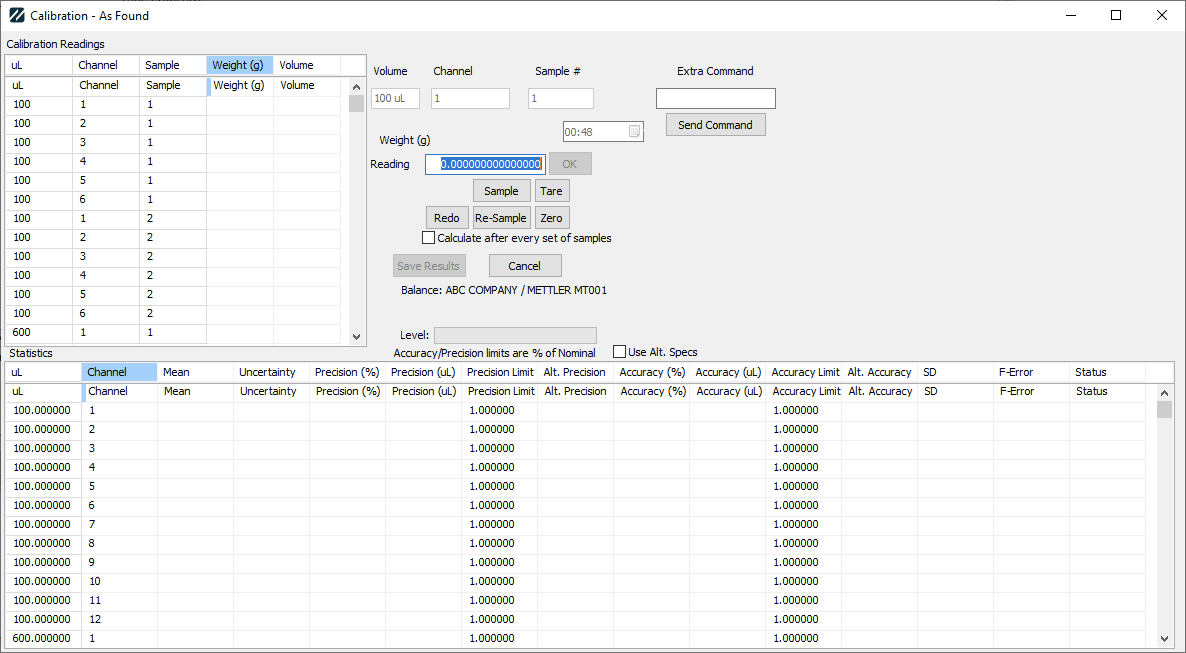
RS-232 data-collection form
When the dialog launches, the first thing it does is set up according to the various settings in the Equipment Extended Attributes and the default test points.
Grids
The Calibration Readings grid has one row for each test point, sample, and channel. The number of samples comes from extended attribute NUMBER SAMPLES (default 5). So 3 test points × 4 samples × 2 channels = 24 rows.
uLcomes from the test point description.Chis always channel 1.Spis the sample number for that test point.
The Statistics grid has one row for each test point. Summary statistics are calculated automatically as data is entered.
Internal variables
| Variable | Source |
|---|---|
samples | Extended Attribute IS_PIP NUMBER SAMPLES (default 5) |
accuracy | Extended Attribute IS_PIP CHECK ACCURACY (default false) |
precision | Extended Attribute IS_PIP CHECK PRECISION (default false) |
cycle timer | Extended Attribute IS_PIP USE CYCLE TIMER (default false) |
mode | Extended Attribute IS_PIP MODE |
calc type | Extended Attribute IS_PIP CALC TYPE |
minutes | Extended Attribute IS_PIP CYCLE MINUTES |
seconds | Extended Attribute IS_PIP CYCLE SECONDS |
evap blank | Extended Attribute IS_PIP EVAP BLANK INTERVAL |
initiate | true if mode isn't a - TARE mode |
evap | 0 |
evap counter | 0 |
Zfactor | from the Environmental Data screen |
Run Type | AS LEFT or AS FOUND |
Calculate after... | IS_PIP CALCULATE AFTER (default unchecked / "set of samples") |
Cycle timer
If the cycle timer is being used, a countdown timer is displayed above the OK button. Every new reading resets it to minutes:seconds.
Reading entry
The Reading field has twice the number of digits available as the maximum resolution on the test points.
If no balance is connected, the only way to enter readings is directly in the Calibration Readings grid or in the Reading entry.
A successfully connected balance does not mean the settings are correct. Other issues can block data from being read.
When a reading is sent from the scale, an attempt is made to convert it to a number. For example:
N + 0.4498 gis parsed as0.4498N - 1.26 gis parsed as-1.26
The value is placed in the Reading input and the OK button is enabled. You can review it, modify it, or just press OK to accept it. A new reading overwrites the current one.
Pressing OK
When OK is pressed:
- If the cycle timer is visible, it's reset.
- If the mode is
ADDITIONorSUBTRACTIONandevap blankis not0:- Increment the evap counter.
- If the evap counter equals
evap blank, change the field label fromReadingtoEvaporation Blank.- No sample should be taken at this time — the amount of evaporation is being calculated instead.
- The next reading is used to calculate
evap, which becomes a modifier on future readings.
- Otherwise, set the label to
Reading.
- If this isn't an evaporation-blank reading, examine the mode to determine how to calculate it:
ADDITION—current - previous + EvapADDITION - TARE—currentSUBTRACTION—current - previous - EvapSUBTRACTION - TARE—-current
- If this isn't an evaporation-blank reading, the final value of the reading is added to the next row.
- Results for the Statistics grid are recalculated.
You can directly modify the Weight column, but that won't affect what's considered the "current" row.
Multi-balance buttons
If more than one balance is connected:
- Sample — sends the Sample command to prompt the balance to send a reading.
- Redo — sends the Sample command and the above logic happens in the current weight instead of the next weight. Useful for redoing a bad reading from the scale.
- Re-sample — same as Redo, for redoing a bad sample.
- Tare / Zero — sends the respective command to the balance.
If the mode is ADDITION or SUBTRACTION, a Tare button is displayed. Pressing it sets previous to zero.
Statistics calculation
For each Calibration Reading:
Volume = Weight * Z-factor
For each test point (a complete group of samples):
- If precision and
calc type = "INDIVIDUAL BASED", then for each weight: ifabs(weight * Zfactor - nominal) * 100 > precision * nominal, the test point fails. - The individual weights are summed as
SumWeight. MeanWeight = SumWeight / samplesMeanVolume = MeanWeight * ZfactorSDVolume = sample standard deviation of the VolumesPrecision = SDVolume * 100 / MeanVolumeAccuracy = (MeanVolume - nominal) * 100 / nominalF-Error = abs(Accuracy) + 2 * SDVolume- If
samples > 1, save Precision, SDVolume, and F-Error to the Statistics grid; otherwise saveNA. - If using accuracy as a criterion: if
abs(Accuracy) > Accuracy Limit, the test point fails. - If using precision as a criterion and
Calc Type = "AVERAGE BASED": ifsamples <= 1orabs(precision) > Precision Limit, the test point fails.
Test points without full data have the mean, precision %, accuracy %, SD, F-Error, and status cleared. Test points with full data also calculate their uncertainties, if configured.
If all data is entered, the Save Results button is enabled; otherwise it's disabled.
Individual volumes that exceed the accuracy limit appear in the readings grid with a red background. The overall result is listed above the Statistics grid in green (PASS) or red (FAIL).
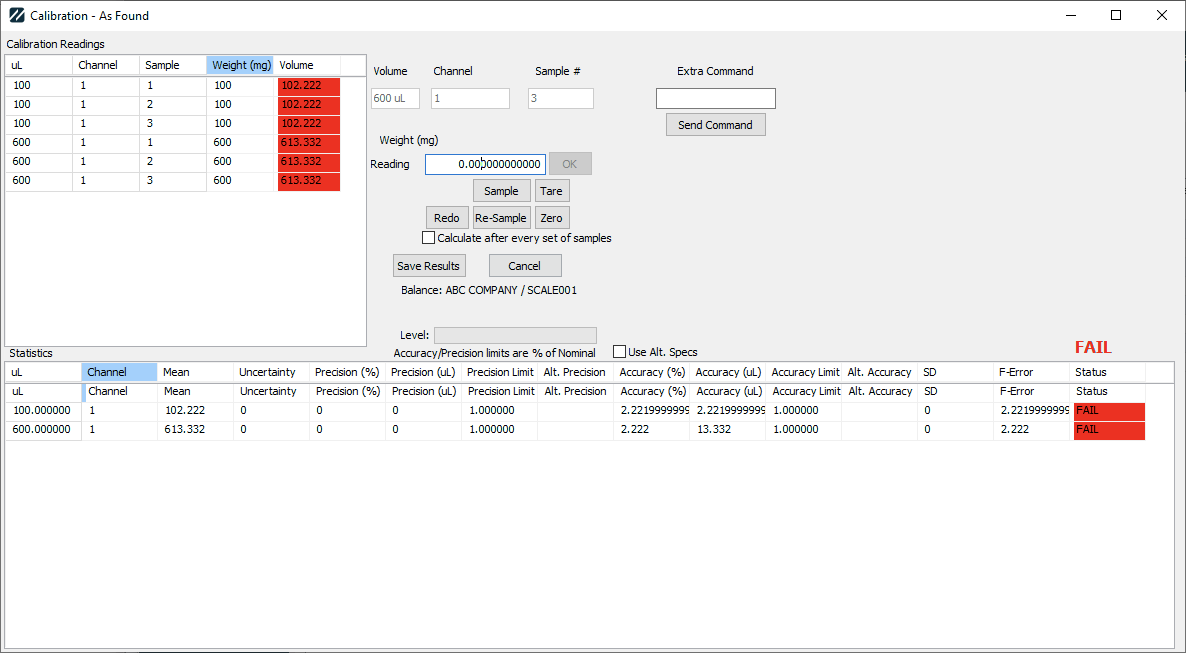
Statistics grid with results
Buttons
- Cancel — closes the dialog and discards all readings.
- Save Results — closes the dialog and saves all readings to Calibration Test Points (
CALPNTS) and Calibration Test Points Extra (CALPNTSEXTRA).- For As Found results, the field name on
CALPNTSEXTRAisAS FOUND #(where#is the test-point number). Results are stored inas_found(1 = PASS, 0 = FAIL),Custom1, andCustom3for the test point. - For As Left results, the field name is
AS LEFT #. Results are stored inas_left(1 = PASS, 0 = FAIL),Custom2, andCustom4. - Overall Pass/Fail/Adjusted results are then calculated for the entire event.
- For As Found results, the field name on
Extra Command
Lets you send device-specific commands to the balance over RS-232. Enter the command in the window, then click Send Command. Refer to your balance's instruction manual for commands and their effects. Only visible when connected to a device via RS-232.